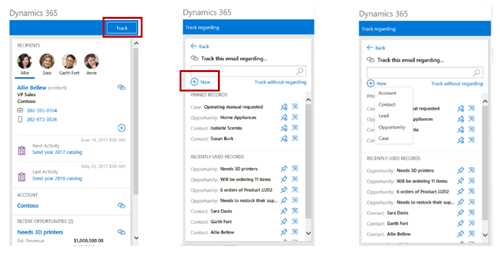
With the Dynamics 365 App for Outlook, users are able to create new records and track/set regarding to that new record. Users are also able to track/set regarding to existing records. In its basic state, this is limited to certain record types: Account, Contact, Lead, Opportunity or Case. However, as an admin, this list can be expanded to include as many entities as your heart desires, or that will actually be useful. Let’s take it step-by-step!

Step #1: Add the entity to the list of entities which are enabled for Categorized Search.
Navigate to Settings > Administration > System Settings. From the System Settings menu, select the General tab and scroll down until you find the section on Categorized Search. Click “Select”.

Step #2: Choose the entity or entities you’d like to add. Click “Add”, “OK” and “OK” again back in the System Settings window.

Step #3: Now, you’ll need to enable Activities for the entity, which will allow your users to set regarding on their emails and appointments to the entity.
Navigate to Settings > Customizations > Customize the System. Select the entity and scroll down to the Communications & Collaboration section. Add a check next to “Activities”. Then, under the Outlook & Mobile section, check “Enable for Mobile” and ensure that “Read only in mobile” is unchecked. Save and publish.

Step #4: Have your users log-out, clear their cache and log back in. Then, they’ll be ready to start tracking their emails and appointments against the entity!


What if you do all of this and it still does not appear in your Dynamics 365 App for Outlook?
Emma, time to get help from your CRM or Office 365 administrator. Or, if you are the administrator, then reach out to the Microsoft Online support team for help. If you need a partner to help, use this URL to locate one based on your location. This new App for Outlook keeps getting better so take the time to get it setup right. Thanks for the comment.